Introduction
Quick Start
The fastest way to get up and running with Fig is to clone the fig quick start repository. This repository contains an aspire setup with the Fig API and Web as well as a sample application using Fig for configuration.
Instructions below uses docker compose to set up fig as an alternative.
Install API and Web Client
To get up and running with Fig, you'll need to set up the API, Web and integrate the Fig.Client nuget package into your application.
The API and Web Clients can be installed using Docker. This guide assumes docker is installed and running.
-
Clone the fig repository and use the
docker-compose.ymlfile included. -
Open a terminal / command prompt, navigate to the directory containing the docker-compose file and type
docker-compose upto download the containers and run them.
Log in to Web Client
Navigate to http://localhost:7148 and at the login prompt enter user: admin password: admin. You should see the administration view of fig with all options available.
Integrate Client
In this guide, we'll create an ASP.NET project from scratch and integrate the Fig.Client to use fig for configuration. However the same instructions apply if you have an existing project. Just skip the project creation.
- Create new ASP.NET project
dotnet new webapi
-
Open the project in your favourite IDE
-
Add Fig.Client nuget package. You might want to add a secret provider nuget package too
-
Create a new class to hold your application settings, extending the SettingsBase class. For example:
public class ExampleSettings : SettingsBase
{
    public override string ClientName => "ExampleService";

    [Setting("My favourite animal")]
    public string FavouriteAnimal { get; set; } = "Cow"

    [Setting("My favourite number")]
    public int FavouriteNumber { get; set; } = 66;

    [Setting("True or false, your choice...")]
    public bool TrueOrFalse { get; set; } = true;
} -
Register Fig as a configuration provider in the
program.csfile.builder.Configuration.SetBasePath(GetBasePath())
.AddJsonFile("appsettings.json", optional: true, reloadOnChange: true)
.AddFig<Settings>(options =>
{
options.ClientName = "AspNetApi";
options.LoggerFactory = loggerFactory;
options.CommandLineArgs = args;
//options.ClientSecretProviders = [new DockerSecretProvider(), new DpapiSecretProvider()]; // if you added a secret provider
o.ClientSecretOverride = "be633c90474448c382c47045b2e172d5xx"; // not for production use, use a secret provider
}); -
Bind the Fig settings to the options system:
builder.Services.Configure<Settings>(builder.Configuration);
- Register Fig with the host:
builder.Host.UseFig<Settings>();
-
Access the settings via the
IOptionsorIOptionsMonitorinterface. UseIOptionsMonitorwhen the application should receive live Fig updates. E.g.public WeatherForecastController(IOptionsMonitor<ExampleSettings> settings)
{
_settings = settings;
} -
Add an environment variable called
FIG_API_URIwith the URI of the Fig API. For example:FIG_API_URI=https://localhost:7281 -
Add a client secret (see Client Secrets section for details on how to do that)
See the examples folder in the source repository for more examples.
Fig NuGet Packages
Fig provides several NuGet packages to support different integration scenarios and environments:
Core Packages
Fig.Client
The main client library for integrating Fig into your applications. This is the primary package you'll need for most scenarios.
- Description: Client library to include in your project when using Fig managed settings
- Target Framework: .NET Standard 2.0
- Usage: Configuration management, settings integration
- Documentation: Client Configuration
Fig.Client.Abstractions
Lightweight abstractions and attributes for Fig configuration settings that can be referenced by third-party libraries without requiring the full Fig.Client package.
- Description: Abstractions and attributes for Fig configuration settings
- Target Framework: .NET Standard 2.0
- Usage: Third-party library integration, minimal dependencies
- Documentation: See active pull request for integration scenarios
Secret Provider Packages
Fig supports secure secret management through specialized provider packages:
Fig.Client.SecretProvider.Azure
Azure Key Vault integration for secure secret management.
- Description: Fig secret provider for Azure Key Vault
- Documentation: Azure KeyVault Integration
Fig.Client.SecretProvider.Aws
AWS Secrets Manager integration for secure secret management.
- Description: Fig secret provider for AWS Secrets Manager
Fig.Client.SecretProvider.Google
Google Cloud Secret Manager integration for secure secret management.
- Description: Fig secret provider for Google Cloud Secret Manager
Fig.Client.SecretProvider.Docker
Docker secrets integration for containerized environments.
- Description: Fig secret provider for Docker secrets
Fig.Client.SecretProvider.Dpapi
Windows Data Protection API (DPAPI) integration for Windows environments.
- Description: Fig secret provider for DPAPI
- Platform: Windows only
Testing and Development Packages
Fig.Client.Testing
Testing framework for Fig clients that allows developers to unit and integration test settings-related functionality.
- Description: A testing framework for Fig clients for unit and integration testing
- Usage: Unit testing, integration testing, development workflows
Fig.Client.Contracts
Internal contracts and interfaces used by Fig client components.
- Description: Fig client contracts
- Usage: Internal package, typically not directly referenced
Installation Examples
Basic Fig integration:
dotnet add package Fig.Client
With Azure Key Vault:
dotnet add package Fig.Client
dotnet add package Fig.Client.SecretProvider.Azure
With testing support:
dotnet add package Fig.Client
dotnet add package Fig.Client.Testing
For third-party libraries (minimal dependencies):
dotnet add package Fig.Client.Abstractions
Documentation Links
- Client Configuration - Basic Fig.Client setup
- Client Secrets - Secret provider configuration
- Azure KeyVault Integration - Azure-specific setup
- Examples - Code examples and usage patterns
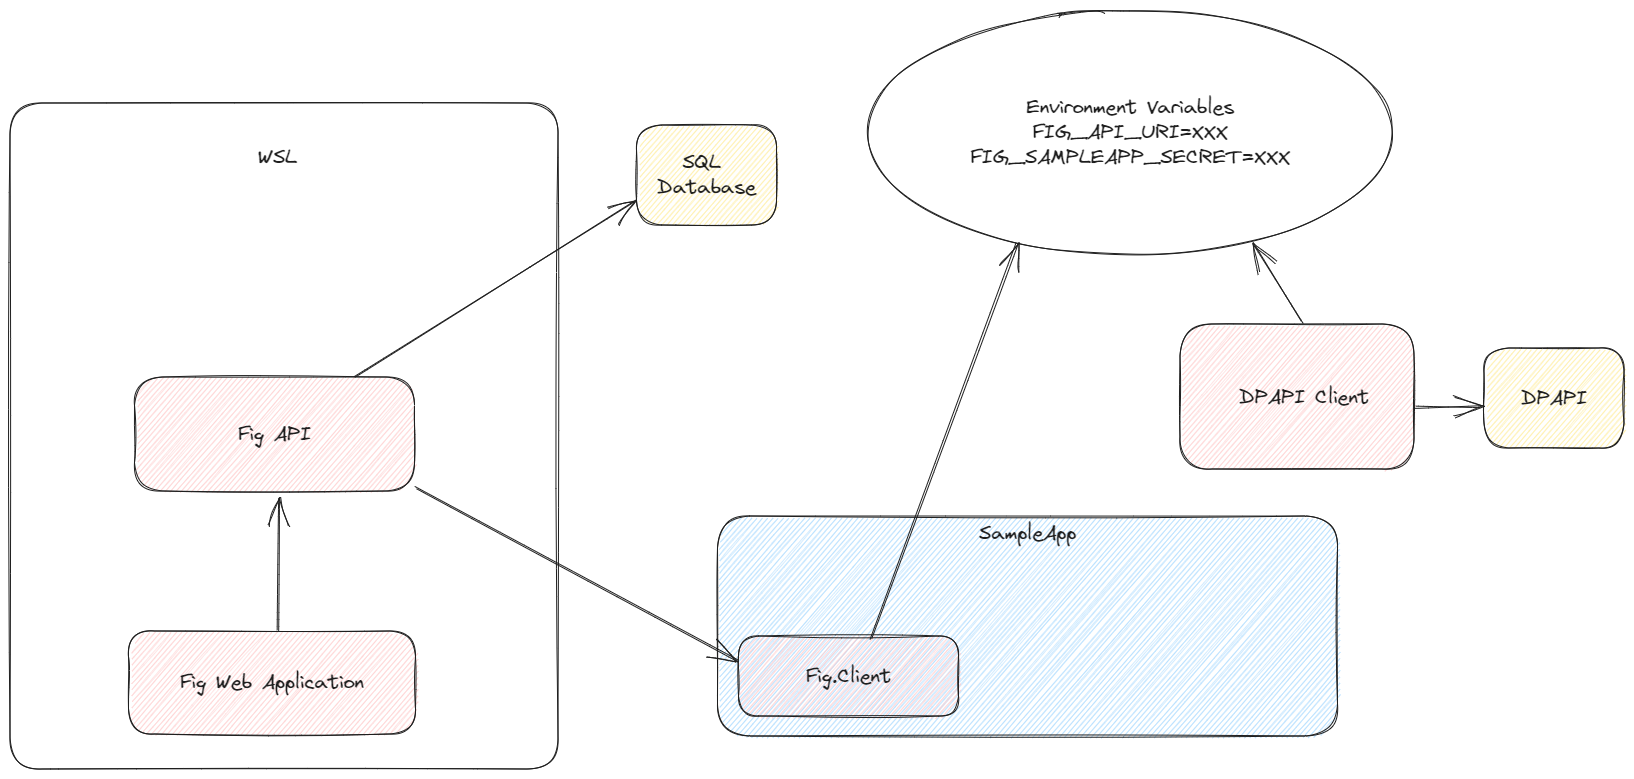
Example Setup using WSL